Learn more about what to do with your biomonitoring kit, how to collect samples, and how to return samples to the lab by clicking on any section below or by watching any of our video instructional videos.
Before you Begin
Unpacking your Kit
Unpacking your Kit
- As you open your box, pay close attention to how the kit is packed so you can re-pack it in the same way when you return the samples to the lab. Do not throw away any of the items. You will need all of them to complete the tasks and repack the kit.
- On top of the Styrofoam cooler, you should see a plastic bag containing paperwork.
- You will see a cover letter welcoming you to the Iowa Biomonitoring Program. It is important to note that the link to the questionnaire is in this letter, so hang onto it until the day you collect the samples.
- You will also see a consent letter which describes our study in detail. Make sure you carefully read and understand this information before you collect any samples.
- We have also provided a pamphlet with helpful instructions to collect the samples, as well as a Sample Collection Form you will need to complete.
- Next, we have provided some materials for the return shipment, including:
- Bubble wrap or packing paper to protect the glass bottles,
- Ice packs to keep the samples cold in transit,
- An ‘Exempt human specimen’ label for the outside of the return box
- A prepaid UPS shipping label
- Lastly, you will see all the materials needed for collection of the urine and water samples.
- For urine collection, your sample kit includes:
- A collection container
- A plastic biohazard bag
- A protective Styrofoam case to help prevent the container from breaking or leaking during shipment
- For water collection, your sample kit includes 6 bottles:
- 4 small amber glass bottles
- 1 small plastic bottle
- 1 large plastic bottle
- You may notice a powder or liquid in some of the bottles for water sample collection. These are preservatives added by the lab. Be very careful not to touch the inside of the bottles or lids or to rinse out the preservatives. If you do touch the preservatives, thoroughly wash with soap and water.
Make a Plan
Make a Plan
- When your kit arrives, immediately put the provided ice packs in your freezer so they are frozen solid for the return shipment.
- Samples must be kept cold when shipped back to the State Hygienic Laboratory
- Pick a single day when you will be able to complete all tasks.
- It should take about an hour to an hour and a half total.
- You do not have to do everything at the same time, but it is important to do it all on the same day.
- Plan to collect the urine sample first thing in the morning, which is referred to as a “first void” sample.
- Plan to collect the drinking water samples from an indoor faucet commonly used for drinking and cooking (e.g. kitchen sink).
- Plan to complete the online questionnaire using the link provided in the cover letter you received with your kit.
- Ship your samples within 3 days of collection.
- Be sure to review the enclosed instruction pamphlet for details about cooling the samples prior to shipping.
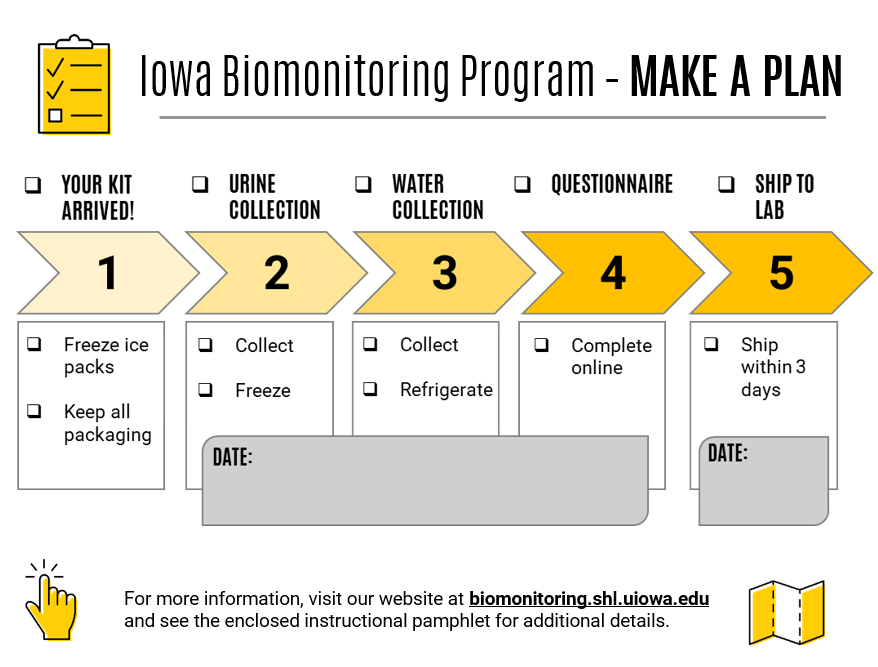
- We also have included a handy “Make A Plan” postcard that you can hang on your refrigerator to use as a visual guide as you progress through each step of the process. Below is an example of this postcard:
Collecting Samples
Collecting the Urine Sample
Collecting the Urine Sample
Collect the sample immediately upon waking for the day following the steps below.
- Label the sample container.
- Wash your hands with soap and water.
- Separate skin folds around the urinary opening.
- Using the provided towelette packets, clean the urinary opening and surrounding areas from front to back.
- Urinate into the toilet for a few seconds and then stop.
- Place the empty container into the path of the stream.
- Restart the urine stream and collect into the container.
- Tightly screw the cap onto the container.
- Wash your hands with soap and water.
- Place the container and absorbent pad into the biohazard bag.
- Immediately freeze the packaged sample until you are ready to ship it back to the laboratory.
- Prior to shipping, place the sample in the small Styrofoam case and secure it closed with the rubber band.
Collecting the Water Samples
Collecting the Water Samples
CAUTION: All bottles are sterile. Plastic bottles contain chemical preservatives. Do not overfill the bottles or touch inside the bottles or lids. In case of contact with eyes, skin, or clothes, immediately rinse with water for up to 15 minutes and call a physician if irritation persists. We recommend wearing the provided disposable vinyl gloves. Protective eyewear (not provided) is also advised.
- Select the sink you most often use for drinking and cooking. Set a clean paper towel on the counter.
- Label each bottle with the date, time, and participant ID.
- Wash your hands with soap and water. Put on gloves.
- Turn the cold water on high for 5 seconds, then reduce the water to a slow, steady stream.
- One bottle at a time:
- remove the lid from the bottle (being careful not to touch inside the lid or
containers)
- place the lid on the clean paper towel
- slowly fill the bottle to the shoulder, 1/2 inch below the lid (do not overfill the
bottle or pour water out)
- tightly screw the lid back onto the bottle
- repeat until each bottle is filled - Immediately refrigerate the samples until you are ready to ship them back to the laboratory (within 3 days).
Packaging and Shipping Samples
Packaging Samples
Packaging Samples
- As a reminder, please make sure each sample collection container is labeled with your participant ID (located on the top right side of the kit cover letter, ex: 2345ABC) and the date and time that the sample was collected.
- Water samples should also have the location of the faucet you sampled (e.g. kitchen sink).
- Package urine sample:
- First, take the urine sample, already sealed into the biohazard bag, out of the freezer.
- Next, set it into the small Styrofoam case for protection and use a rubber band to secure the case closed.
- Then, set the case containing the urine sample upright in the bottom of the large Styrofoam cooler.
- Package water samples:
- First, wrap each amber glass bottle individually using the provided bubble wrap or paper padding.
- Next, place each wrapped glass bottle into the larger Styrofoam cooler.
- Then, wrap both plastic bottles in the provided plastic bags, twist-tie them closed, and place them into the large Styrofoam cooler.
- Take the frozen ice packs out of your freezer and place them carefully around the collection containers.
- Fill any empty spaces with bubble wrap or packing paper to prevent bottle breakage, and then place the Styrofoam cooler into the cardboard shipment box.
- Before sealing up your box, fill out the top half of the “Sample Collection” form, which you received with your kit in a large plastic bag of paperwork.
- Most of the fields on the “Sample Collection” form are already filled in, but there are a few blanks that you will need to complete about your sample.
- Please be thorough! This is the only information that identifies you and your samples when they arrive at our lab.
- Put your completed “Sample Collection” form into the large plastic bag and place it on top of the large Styrofoam cooler inside the box.
- Make sure that you seal the box completely with packaging tape. Wrap the tape all the way around the box in several locations so it doesn’t open during transit.
- Make sure to attach both the adhesive prepaid shipping label and “Exempt Human Specimen” label to the outside of the shipment box.
Shipping Samples to the Lab
Shipping Samples to the Lab
- To return your samples to the lab, you will need to take the shipment box to any local UPS drop off location.
- Reminder: Make sure the box is sealed completely with packaging tape and both adhesive labels are attached to the outside of the box.
- If you aren’t sure where your closest UPS drop off spot is located, you can go online to www.ups.com/dropoff
- If your internet browser’s location settings are turned on, you can click “Use my current location” to search for the closest UPS drop off spot.
- If your location settings are turned off, you can type your street address, city, and/or zip code into the search box and click the magnifying glass icon to search.